To remove bathtub grab bars, first determine how they are installed, as this affects the tools and steps needed for removal.
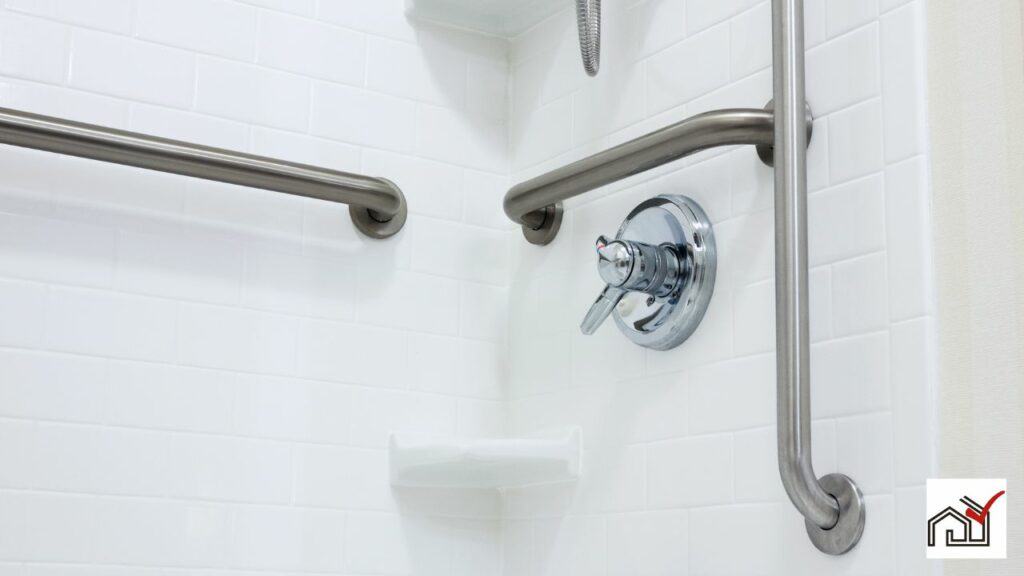
Most grab bars are attached to wall studs with screws hidden under escutcheons. Remove these escutcheons, cut away any caulk, and unscrew the fixtures carefully to avoid damaging the wall.
After removing the grab bars, fix any damage to the wall to maintain a smooth and secure surface.
This guide outlines the essential steps for removing bathtub grab bars, from assessing the installation to repairing the wall and cleaning up.
Assessing Grab Bar Installation
Inspecting the grab bar installation is essential for safe removal. First, check how the grab bar is attached to the wall, usually to studs for stability. Understanding the mounting method determines the necessary tools and removal technique.
Examine if there are escutcheons hiding the screws. They may be caulk-sealed and require a flat-head screwdriver to remove without damaging the wall. Revealing the screws will indicate whether a drill or socket wrench is needed based on the screw type.
Look for set screws under the escutcheons, which might need a hex or Allen key. Missing these screws could lead to wall or grab bar damage during removal.
A complete inspection ensures safe grab bar removal and reduces wall damage, leading to easier wall repair and hole patching, which varies with the wall material, like drywall or tile.
Gather Necessary Tools
To remove a bathtub grab bar, gather the following tools: a sharp utility knife, a flat-head screwdriver, a drill with a Phillips bit, a socket wrench with a variety of sockets, and patching compounds. Start by using the utility knife to cut through any caulk around the escutcheons. Check for set screws on the escutcheons, which may require a flat-head screwdriver to loosen. Use a drill with a Phillips bit for removing Phillips screws quickly and without stripping the heads.
For grab bars installed with lag screws, use a socket wrench. The socket size might vary, but typically a 1/4-inch or larger socket is needed. Have a range of socket sizes available.
Prepare for wall repairs after removing the grab bar. Use patching compounds to fill holes, and have a putty knife and sandpaper to smooth the area. Having these tools ready will help you remove the grab bar efficiently and keep your bathroom looking good.
Detach the Grab Bars
To remove grab bars from a bathtub wall, follow these steps:
- Prepare your tools and work area.
- Determine how the grab bars are attached, usually by checking the installation instructions.
- Most grab bars have escutcheons at each end. Remove any caulk and pry off the escutcheons with a putty knife or flat-head screwdriver, taking care not to damage the wall.
- Once the escutcheons are off, unscrew the fasteners using a drill or socket wrench, depending on the screw type. Support the grab bar as you remove the last screws to avoid accidents.
- After removal, check the wall for holes or damage. For fiberglass walls, use a repair kit with two-part epoxy to fill holes. Sand the area smooth and touch up with enamel paint for a finished look.
Repair Wall Damage
After removing bathtub grab bars, it's important to repair any wall damage. This ensures the bathroom walls look good and remain structurally sound, which helps prevent moisture issues.
For drywall, fill the holes with joint or spackling compound, smooth it, let it dry, then sand it to be even with the wall. This prepares the surface for painting or texturing.
Tile repairs are more complex. Use epoxy glue to fill holes. Achieving an exact match may be difficult, but color-matched epoxy can reduce the visibility of the repair.
Fiberglass surrounds require a two-part epoxy kit to fill and sand the holes. Proper epoxy application and thorough sanding are key. Enamel paint might be needed to match the tub or shower for a complete repair.
Repairing wall damage after grab bar removal extends the life of your tub or shower and protects the wall from further damage.
Finishing Touches and Cleanup
After repairing wall damage, clean the area thoroughly and apply aesthetic touches for a polished bathroom appearance. Sweep or vacuum debris, then wipe down surfaces with a damp cloth to remove repair material residue. For visual consistency, apply enamel paint that matches the existing color and finish to the bathtub or wall.
If the grab bar was essential for safety, particularly for the elderly, evaluate the bathroom for safety and consider alternative safety solutions. Dispose of the grab bar and fixtures according to local regulations for a clean, safe, and visually appealing bathroom.


