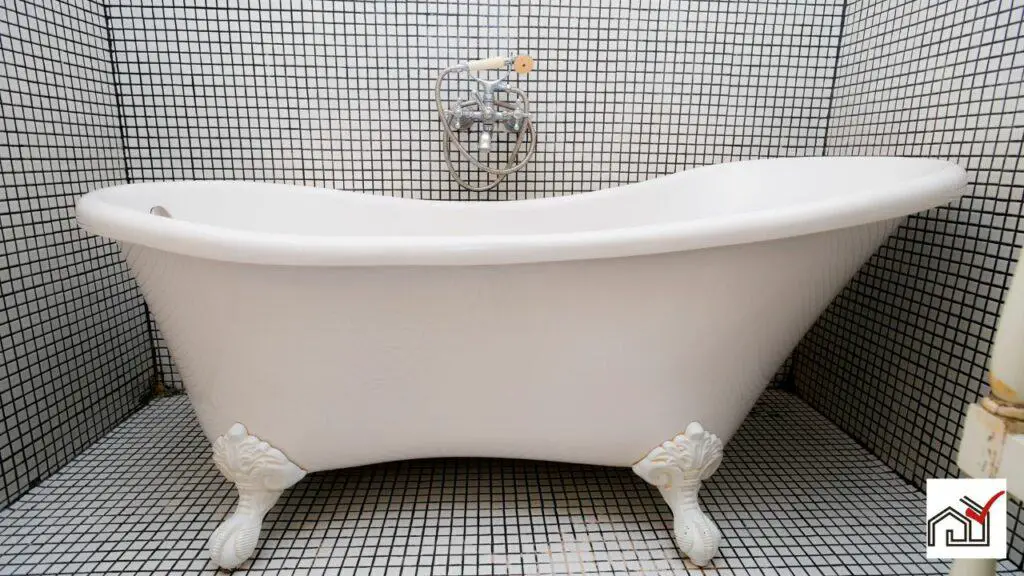
The spacing of bath legs is essential for a stable and durable bathtub installation. The correct space between legs depends on the type of bathtub, such as freestanding, clawfoot, or built-in. Bath legs should be placed to evenly support the tub and prevent damage or plumbing issues.
The spacing should be measured and adjusted for evenness. The tub's design, weight, and material affect leg spacing. Installers should follow guidelines and manufacturer instructions for proper leg placement.
Understanding Bath Leg Basics
Bath leg placement is essential for the stability and safety of a bathtub. The legs support the weight of the tub, water, and users.
Freestanding tubs usually have four legs, while built-in tubs often use a frame for support. It is important to evenly space the legs to evenly distribute weight and prevent the tub from becoming unstable, which could cause damage or cracking.
Following the manufacturer's instructions for leg placement is necessary for a stable installation. These guidelines typically include the proper distance between legs and how to attach them to the tub.
During installation, measure the tub accurately to ensure legs are spaced equally. Use a level to check that the tub is even on all legs to prevent movement. Correct leg placement and leveling are critical to avoid tub damage and ensure user safety.
Standard Spacing Guidelines
Standard spacing for bath legs should match the tub's size for stability and weight distribution, preventing leaks and damage.
For freestanding tubs, legs must be at each corner for even weight support. The legs should be equally spaced, checked with a level for proper alignment and drainage.
Built-in tub legs, less visible, should be under the tub's rim to distribute weight and maintain the seal.
Compliance with these guidelines is important for bathtub durability and functionality.
Factors Affecting Leg Placement
The placement of bathtub legs is influenced by several factors to ensure stability and durability. The type of bathtub, either freestanding or built-in, greatly affects leg positioning. Freestanding tubs often need evenly spaced legs for balance, whereas built-in tubs typically have legs under the rim for hidden support.
The bathtub's size is also important. Bigger bathtubs require more support to handle the increased weight, which may mean more legs or strategically placed legs for even weight distribution. Smaller bathtubs can have fewer legs if placed correctly.
The floor material is a consideration; floors that may flex or are uneven might need a tailored leg placement strategy. Legs should also have the right fittings to prevent slipping and floor damage.
Leg placement is also determined by the base design of the tub, with some having set points for leg attachment and others allowing flexibility. Proper measurement and leveling are essential to prevent the tub from wobbling and to avoid damage from uneven weight distribution. Tools such as a tape measure and level are critical for this process.
Measuring for Perfect Alignment
Precise measurement and correct placement of a bathtub's legs are essential for stability. Proper alignment prevents structural stress and ensures safety.
First, place the bathtub in its final spot, ensuring it is centered and aligned with walls and fixtures. Measure the distance from the center of one leg to the center of the opposite leg using a tape measure to confirm parallel alignment and equal leg spacing lengthwise.
For four-legged bathtubs, measure the width by connecting the centers of adjacent legs on the same side to maintain symmetry and balance.
Check and compare the distances between legs on all sides. If any measurements are unequal, adjust the legs until they are consistent.
Accurate alignment ensures the bathtub's balance, longevity, and a safe bathing experience.
Ensuring a Level Bathtub
A level bathtub is essential for proper function and safety. It ensures comfort and helps prevent water damage from improper drainage. A professional plumber can level the bathtub accurately by adjusting its legs until a spirit level indicates the tub is even both side to side and end to end.
The plumber will make small adjustments to the legs, checking repeatedly with the level. All legs must touch the floor firmly, especially for freestanding tubs that depend on leg support. For built-in tubs, the plumber will also examine the support frame for levelness and stability.
Leveling the bathtub is a precise task that can safeguard against uneven stress and extend the tub's lifespan. A professional plumber's expertise is beneficial for this process to ensure a stable foundation for the bathtub after the legs are spaced correctly.
Adjusting for Tub Materials
The type of material a bathtub is made of determines how the legs should be adjusted. Cast iron tubs are heavy and require strong, well-anchored legs to support their weight without damaging the floor. Acrylic bathtubs are lighter, so their legs need to be stable to prevent the tub from flexing.
When setting the legs, it's important to account for the tub's weight along with the water and user's weight. Light materials like fiberglass might need legs placed closer together to avoid movement, while heavier materials like enameled steel may need legs spread out to balance the weight evenly.
Due to the complexity of leg adjustment for different materials, hiring a professional installer is recommended. They have the necessary knowledge to evaluate the bathtub's material, design, and the structural integrity of the bathroom. A professional will ensure the bathtub is level and secure, avoiding issues like uneven wear or water damage from incorrect leg placement. Investing in professional installation can prevent future problems and safety risks.
Installation Tips for Stability
To install bath legs correctly, measure where the legs will attach, ensuring consistent spacing as per manufacturer instructions. Position freestanding tub legs at corners for weight distribution, and ensure built-in tub legs are properly placed under the rim for support.
Use a level to check the tub is even on all legs, adjusting if needed. Avoid over-tightening when securing the legs to prevent damage. For adjustable legs, set all to the same height to maintain a level base.
Following these instructions ensures a stable and safe bathtub installation, contributing to the overall durability of the fixture.
Maintaining Your Bath's Foundation
To maintain the stability of a bathtub's foundation after installation, it is necessary to perform regular inspections to ensure the legs or support frame remain properly positioned as per the manufacturer's instructions. This is particularly important for freestanding tubs, which require an even distribution of weight across all legs.
Adjustments may be needed over time to counter any settling of the building or shifting within the house that affects the bathtub's balance. It is crucial that each leg continues to equally support the weight to avoid stress on the structure.
For built-in tubs with support frames, regular checks are also important, even though the legs are not visible. The support frame's integrity is key to the tub's stability.
Keeping the area around the bathtub clean and dry helps to prevent corrosion or damage to the legs or frame. It is important to fix any leaks quickly to protect the foundation materials.
It is essential to follow the manufacturer's weight limits to prevent overloading the bathtub, which can cause damage to the legs or frame. By adhering to these maintenance practices, homeowners can help ensure their bathtub remains stable and secure over time.


